Guides / Design
Machining Seatpost Clamps and Head Units: Fits and Failure Points
October 23, 2026
The saddle is the rider’s biggest contact point, and the seatpost head holds it. Under the saddle there is a clamp that grips two rails and lets the saddle tilt. Lower down, a collar locks the post inside the frame. Both are small CNC parts with a lot to get right: diameters that match a standard, clamps that grip without crushing and bolts that do not strip. This guide covers the main features and the mistakes that cause returns.
The three parts
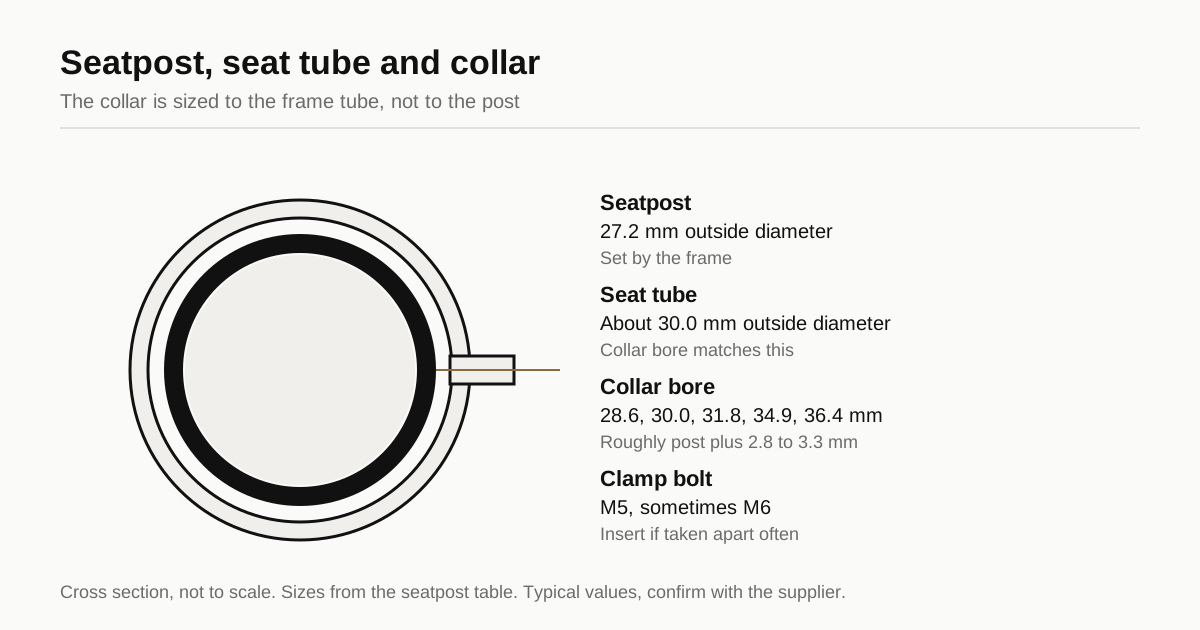
The seat collar. A ring that clamps around the top of the seat tube and squeezes it onto the post. It has a bore, a split and a clamp bolt. It is the simplest of the three.
The seatpost shaft. The tube that goes into the frame. Sold in standard diameters and lengths. The shaft is usually extruded or drawn tube, with a machined head welded, bonded or threaded onto it, but one-piece machined posts exist.
The head unit. The top of the post. It has a cradle that grips the saddle rails, a mechanism to adjust tilt and one or two bolts that tighten it. This is the part that sees the most machining.
The seatpost table lists the standard sizes. The common post diameters are 27.2, 30.9 and 31.6 mm. Seat collar bores are 28.6, 30.0, 31.8, 34.9 and 36.4 mm. The collar fits the seat tube, so the collar bore is about 2.8 to 3.3 mm larger than the post.
Seat collar details
A collar looks trivial, but the fit decides its life.
- Bore tolerance. The bore must fit the seat tube’s outside diameter, which varies a little between frame makers. A tolerance of about plus 0.1 and minus 0 mm on the bore is common for a collar.
- Slot or split. A single cut across the ring, wide enough to close under the bolt without bottoming out. Radius or drill the slot ends to avoid cracks. This is the same logic as on a stem, as described in the stem guide.
- Clamp bolt. Usually M5, sometimes M6. The bolt axis sits tangent to the ring with bosses on both sides.
- Wall thickness. Thin walls save weight but flex and lose clamp force. Keep wall thickness consistent around the ring so the clamp load spreads evenly.
- Edge breaks. The inside edge needs a chamfer so it does not scratch the seat tube, and a smooth outside edge for the rider’s leg.
Quick-release collars add a lever and a cam. Their geometry is more complex, and the cam must be matched to the stroke of the lever.
Head unit geometry
The head unit has several clamping designs.
| Design | How it clamps | Notes |
|---|---|---|
| Two-bolt, front and rear | Two bolts tilt the saddle by pushing or pulling the cradle | Easy tilt adjustment, common |
| Single bolt, side clamp | One bolt tightens both the angle and the grip | Light, tilt is harder to set |
| Rail clamp with serrated seats | Serrated faces lock the angle | Precise steps, needs accurate serrations |
| Vertical post-top clamp | Rails sit in a clamp that sits on top of the post | Used on some droppers |
Rail dimensions are set by the saddle. Round rails are 7 mm diameter. Oval carbon rails are 7 by 9 mm. A clamp for round rails has a half-round seat, and a clamp for oval rails has an oval seat. If the seat is too tight or too shallow, the rail sits on an edge and the clamp pressure concentrates there. For carbon rails, a hot spot can crush the rail, and carbon saddle makers state the allowed clamp shapes. Always match the clamp seat to the real rail.
The features that cause trouble
Rail seat radius and surface. The surface in contact with the rail must have the right radius and a smooth finish. A sharp edge at the seat entry scratches or cuts the rail. A rough finish lets the rail creep. Typical finish is Ra 1.6 micrometers or better, with a radiused edge.
Serrations. If the head unit uses serrated faces to set the angle, the tooth pitch and depth must be accurate. A bad profile gives uneven steps and slip. Serrations are usually milled with a form cutter or a small ball mill, and a CMM or optical comparator verifies the profile.
Bolt threads. The clamp bolts are tightened and loosened every time the saddle moves. Threads cut in aluminum wear out. Use thread inserts or a nut and through hole in high-use positions. Thread engagement in aluminum should be at least 1.5 times the bolt diameter, as explained in the thread guide. Add a chamfer at the thread start.
Bolt head seat. The surface under the bolt head or washer needs to be flat and square, or the bolt loosens. A countersunk or spotfaced seat keeps the head from digging in.
Ear thickness and bend. The clamp ears on a rail clamp are loaded in bending when the bolts tighten. Thin ears bend and the clamp loosens. Keep ear thickness adequate and radius the inside corner.
Post-to-head interface. If the head is a separate part, it joins the shaft with a threaded, bonded or press-fit joint. That interface carries the entire rider load and needs its own tolerances and a clear assembly process.
Loads, fatigue and testing
A seatpost sees a rider’s weight, bumps and the pull of the rails. The most common failure is a fatigue crack where the shaft meets the head, or at the bottom of the clamp ear. Broken seatposts are a serious safety issue.
Seatposts and saddles are tested under ISO 4210-9, which covers the test methods for saddles and seatposts. Parts must pass fatigue loads at the saddle position. The post must also carry a minimum insertion mark, which tells the owner how far to insert the post. See the ISO 4210 overview and the test lab guide for how to arrange tests.
Design for fatigue by using smooth transitions, avoiding sharp internal corners and keeping bolt holes away from the highest stress areas. Material choices of 6061-T6 and 7075-T6 are common, as discussed in the alloy guide.
Finish and anodizing
Seatpost parts are usually anodized in colors that match a brand range. Concerns:
- Clamp seat dimensions change with coating. A rail seat that is a few micrometers tighter may scratch the rail. Account for it.
- Color match between parts is important when the collar and the post are sold together. The color matching guide explains the variation.
- Contact faces under bolt heads should not be coated thickly, since coating compresses under load.
- The shaft surface must be smooth and have the right size, as the post slides in the frame. Hard anodize on the shaft protects it from scratches but raises the diameter.
Laser marking is common on the post for the insertion mark and size. Keep deep marks away from the high-stress zone near the head. See the laser marking guide.
Cost drivers
Seat collars are quick and cheap, mostly a turned ring with a milled slot and a drilled boss. Head units are more complex and cost more, since they have several faces, threaded holes and sometimes serrations. Setups are the main driver. A head unit on a 3-axis machine may take three or four setups, and on a 4-axis machine two. The cost guide shows how that moves the price.
What to put on the drawing
- Post diameter or collar bore, with tolerance
- Rail type and size, with the clamp seat radius and finish
- Bolt sizes, thread class, thread depth and any insert
- Serration profile, if used
- Material, temper and finish
- Torque spec for the bolts
- Insertion mark position and marking method
- Flatness and squareness of bolt seats
- Inspection plan: gauges for bore and threads, first article
Send your drawing through the RFQ page and we match you with up to 3 machine shops. They reply within 24 business hours.
Frequently asked questions
Why is a seat collar bore larger than the seatpost?
The collar sits on the outside of the frame's seat tube, not on the post. Its bore matches the tube diameter, which is roughly 2.8 to 3.3 mm larger than the post. For a 27.2 mm post the tube is about 30.0 mm, so the collar is sized for 30 mm or close to it.
How tight should the saddle rails be clamped?
As tight as the maker's torque spec says and no more. Over-tightening crushes carbon rails and bends the clamp ears. Under-tightening lets the saddle slip. The head unit design should hold the rails without hot spots, with a clamp surface that matches the rail shape.
Do I need a thread insert in the clamp bolt hole?
Often yes for a bolt that is tightened and loosened many times. Aluminum threads wear with repeated use. A steel or stainless helical insert or a through-bolt with a nut gives a stronger, longer-lasting joint than threads cut in aluminum.
Need a quote for this part?
Send the drawing. We match you with up to 3 shops that machine bike parts and reply within 24 business hours.
Get matched with a bike parts shop